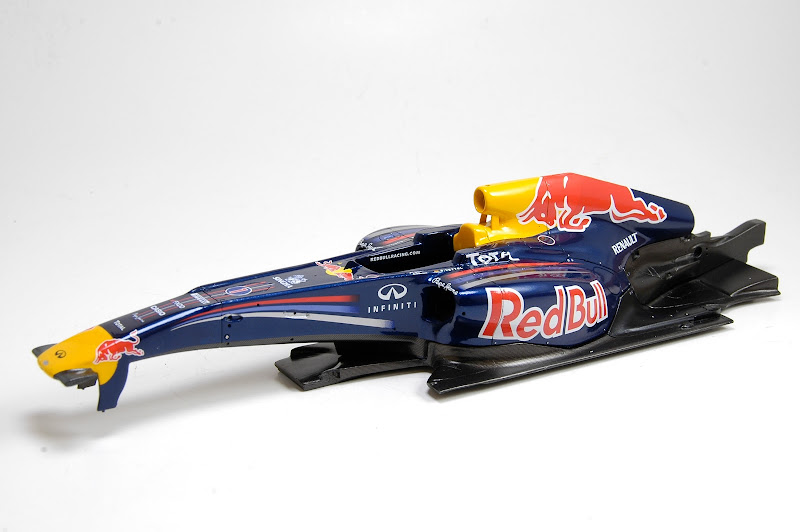
Finally received long awaited package with this kit. Fujimi keeps putting out kits of exciting subjects I like and I keep starting them. Every time I see a new kit of my desired subject I get excited and start it right away and I always forget how problematic their kits could be. Anyway it's much better to have a bit problematic kit of desired subject, then have no kit at all. I've started to detach parts from trees and test fit. Fit of body panels is off again, as it was more or less the case for every previous Fujimi kit I've built. I used to think it was design problems. But looking at parts of this kit, it seems parts were designed well, but many of them seem to have got a bit deformed during manufacturing. So, now I think there are manufacturing issues with Fujimi kits, which lead to poor fit. Or may be it's a combination of both. With all that said, I'm still determined to do my best to improve fit as much as I can. There are some design decisions in this kit that I still don't like. For example, separate front parts of side pods. They are quite difficult to align with rest of body panels. Side pod parts of engine cover are also a bit deformed, which in turn prevents top part of engine cover from sitting well. I'll see what I can do to correct these fit issues. Because this model is going to be curbside, hopefully I will be able to just glue some of the panel shut and stretch them a bit while gluing in.
Below are photos of arrived kits and initial test fit assembly of body panels.
Saturday, November 10, 2012
Thursday, November 1, 2012
RB7 is finished (at least for now)
I have finished it up to this stage last Saturday, before Ajax IPMS contest. It took second place in "Open Wheel Competition" category. I don't think there was much competition between models, though, as my own models took 1st, 2nd and 3rd. 1st was Lotus 79 1979 and 3rd MP4/22. Model is still missing some PE bits and steering wheel needs to be detailed. But I'm kind of sick and tired of it by now and need to switch to some other builds. I'll complete it later, when muse comes back.
Wednesday, October 24, 2012
RB7's assembly continues
Installed radiator's PE, CF'ed cockpit walls, dashboard and seat into main body shell. Made and installed pull rods to rear suspension. Put together permanently front and rear suspensions. And finally attached body and gearbox to the floor. Alignment of the front suspension is a bit better. Hopefully car will stand on all 4 tires in the end. Tires are ready as well by now. Wings are next to be assembled and installed.
One more modification I had to make was to saw about 0.5mm from hubs on the rear uprights. That changes the "offset" and allows rear wheels to sear deeper. This way it looks more like real car. Using kit parts as is would have put rear wheels too much out and left visible gap between rims and edges of uprights. I still have small gap, but it's quite a bit smaller, then it was before my mod. Just realized, that this mod reduces space available to fit brake components. Hopefully they'll still fit.
Sunday, October 21, 2012
RB7 final assembly started
All the parts, which required clear coat were coated with Zero 2K and Gunze H30. Wheels are getting ready as well. Installed polished inserts into rims, put tires on, applied wheel decals, sprayed with Testor's metalizer sealer to protect decals and get gloss surface for tire decals. Added seat belts. I've used materials and bits from different sets I have, trying to match real car. Final assembly started with rear suspension. Resulting geometry will be quite a bit off, but I could not assemble it anyway different. It would have been nice to CF uprights and brake ducts, but I'm running out of time and just left them SG black.
Thursday, October 11, 2012
Riveting RB7's floor and gearbox
I've got myself 2 more bags of rivets and set off to add them to gearbox and floor. Took me 2 evenings to complete. I bet it takes a lot less time to do it on real car. I actually ran out of rivets again. So, I decided not to add all rivets to the floor. Added only those, which hold covers over exhausts and so prominently visible. Apparently I underestimated number of rivets needed. Well over 80 of them would have been required to finish the floor, gearbox and body completely.
Tuesday, October 9, 2012
Simulating fasteners with rivets
More work done on the RB7 model. I've installed metal revers into main body to simulate fasteners. I guess on real car those fasteners would be flat with body panel surfaces. On the model heads of rivets stick out a bit. However I found them to give reasonable appearance and I'm OK with that. Not a big visual update, but it took quite a bit of time. I've also added some PE round nut heads to rear wing end plates and the floor. I plan to add more rivers to floor and gearbox, when I manage to replenish my supply. At present I don't have any left. Number of rivets on modern cars is nowhere near the numbers of them on old cars. But I will end up with towards 60 in the end. Still significant amount of work required to fit them. From my experience so far, I'm pretty sure making holes for rivets is much easier in resin then in metal.
There are also small decals added to the body to represent marking, which look to me like FIA seal stamps or something like that. Text on them is very small and not really readable.
Friday, October 5, 2012
RB7's wing elements
Work continues. Tackled decals on wings. No issues with decals for rear wing elements. But as expected "Red Bull" decal, which is split between 3 front wing planes was the most problematic. DTM provided 2 sets of mentioned decals and that's a big help. On rear car flaps overlap, so are the decals. I've used lower part of one set for main flap and top part for top flap. Another set of decals I've used for middle flap. To align lower and middle decals correctly, I've used simple jig from 2 silicone blocks and wing elements, pictured below. However to align top flap mock up wasn't enough. I had to assemble wing elements. I've used small drops of epoxy glue to hold rest of the parts together, while I was mocking up position of top flap and positioning decals. I still did not get perfect alignment, but I think I've got decent one.
Subscribe to:
Posts (Atom)